This page has moved and will no longer be updated. To access the current page, click the Online Help  icon in PrismHR or navigate to the new help docs site and search for your topic.
Setting Up ACH Parameters for Bank Accounts
An ACH parameter is a piece of information that is included in an ACH transaction. To set up the ACH parameters for a bank account, you first need to open the Bank Accounts form (found in the Back Office menu under System|Change) and then enter the Account ID.
The fields that are available in the ACH Setup panel depend on whether your organization is using consolidated or company ACH file processing (set in System Parameters). Refer to the instructions that match the setup in your system.
Basic Consolidated Processing
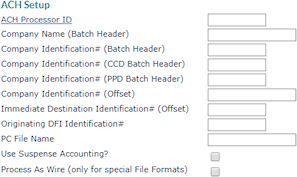
When Consolidated ACH File Processing Used in System Parameters is set to Yes, the ACH Setup panel displays as shown below.
|
2.
|
Enter the Company Name (Batch Header), which is the name of the client who owns this checking account. This name appears in positions 5–20 of the Company Batch Header Record. |
|
3.
|
Enter the Company Identification# (Batch Header), which is the client identification number used only on the batch header. Typically, this consists of a 1 followed by the 9-digit EIN. |
|
4.
|
Enter the Company Identification# (CCD Batch Header), which is an optional client identification number used on the CCD batch header. Typically, you enter a value only when advised to do so by your financial institution. |
|
5.
|
Enter the Company Identification# (PPD Batch Header), which is an optional client identification number used on the PPD batch header. Typically, you enter a value only when advised to do so by your financial institution. |
|
6.
|
Enter the Company Identification# (Offset), which is an identification number used on the offset detail form when this account is specified as an offset account. |
|
7.
|
If the service bank requires you to provide a different account number for offset transactions, enter the Immediate Destination Identification # (Offset). |
|
8.
|
Enter the Originating DFI Identification # assigned by the service bank. It is 8 characters and appears on the lines that begin with 52 and 82 in positions 80–87. |
|
9.
|
Enter the PC File Name, which is an optional field used as the base name of files transferred to your computer. The system also appends the date and .txt extension to the end of the name you indicate in this field. |
|
10.
|
Select Use Suspense Accounting if this bank account should use suspense accounting. When selected, ACH transactions are tracked in a “suspense” account and do not move to the cash account until the ACH batch file is created. That allows users to easily reconcile account balances based on transactions processed by the bank. See Suspense Accounts. |
|
11.
|
Do not select Process As Wire (only for special File Formats) unless directed to do so by a PrismHR Customer Support Team representative. It is only for custom-designed file formats. |
Other Processing
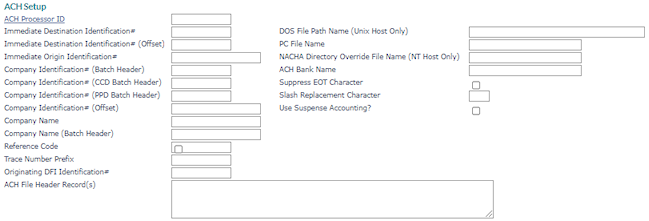
The Company setting uses ACH originators and generates consolidated ACH files sorted by company.
|
2.
|
Enter the Immediate Destination Identification # that identifies the service bank as the destination of ACH input files. |
|
3.
|
If the service bank requires you to provide a different account number for offset transactions, enter the Immediate Destination Identification # (Offset). |
|
4.
|
Enter the Immediate Origin Identification # assigned by the service bank. In the 101 record, this occupies the 10 characters beginning at position 14. If you use headers, this is typically the account number, and could be longer than 10 characters. |
|
5.
|
Enter the Company Identification# (Batch Header), which is the client identification number used only on the batch header. Typically, this consists of a 1 followed by the 9-digit EIN. |
|
6.
|
Enter the Company Identification# (CCD Batch Header), which is an optional client identification number used on the CCD batch header. Typically, you enter a value only when advised to do so by your financial institution. |
|
7.
|
Enter the Company Identification# (PPD Batch Header), which is an optional client identification number used on the PPD batch header. Typically, you enter a value only when advised to do so by your financial institution. |
|
8.
|
Enter the Company Identification# (Offset), which is an identification number used on the offset detail form when this account is specified as an offset account. |
|
9.
|
Enter the Company Name. This can be up to 16 alphanumeric characters, and appears in the 101 record starting at position 64. |
|
10.
|
Enter the Company Name (Batch Header), which is the name of the client who owns this checking account. This name appears in positions 5–20 of the Company Batch Header Record. |
|
11.
|
The Reference Code is optional; use it to refer to your input file for internal accounting purposes. |
|
12.
|
Enter the Trace Number Prefix, which is the first 8 digits of the Trace Number entered in positions 80–94 of the Entry Detail Record. If this field is blank, PrismHR populates it with zeroes. |
|
13.
|
Enter the Company Name (Batch Header), which is the name of the client who owns this checking account. This name appears in positions 5–20 of the Company Batch Header Record. |
|
14.
|
If required, enter the ACH File Header Record(s), which is unique to the financial institution. This information is placed at the beginning of the ASCII file. |
|
15.
|
Enter the full DOS File Path Name (Unix Host Only) to which to download the ACH files built for the checking account. Include the \ (backslash) at the end of the path name. |
|
16.
|
Enter the PC File Name, which is an optional field used as the base name of files transferred to your computer. The system also appends the date and .txt extension to the end of the name you indicate in this field. |
|
17.
|
Enter the NACHA Directory Override File Name (NT Host Only), which is the file name used instead of a standard file name when PrismHR writes to the NACHA directory. |
If your organization uses a bank script to transfer your ACH file to a financial institution that requires the use of a certain file name. If you enter an override file name in this field, the system will always use that file name when writing to the NACHA directory.
This process assumes that there will not already be a file by the same name in the directory when writing to the directory. If it finds an existing file, the system displays a message that gives the user the choice of whether to overwrite the existing file.
|
18.
|
Enter the destination ACH Bank Name used in the header record of the ACH file. If left blank, the system uses the Bank Name. |
|
19.
|
Select Suppress EOT Character to suppress appending the end-of-transmission character (Char(26)) at the end of the ACH deposit file. |
|
20.
|
Enter the Slash Replacement Character that PrismHR replaces with a slash when it builds the ACH file. For example, ^. |
|
21.
|
Select Use Suspense Accounting if this bank account should use suspense accounting. When selected, ACH transactions are tracked in a “suspense” account and do not move to the cash account until the ACH batch file is created. That allows users to easily reconcile account balances based on transactions processed by the bank. See Suspense Accounts. |
