Generating and Downloading an Import Spreadsheet
You can create an import spreadsheet for later use by saving existing settings and then downloading the spreadsheet. This aids in performing subsequent field updates for your employees.
Field imports have an updated format. (See Fields Import Format Changes for details on these changes.)
Note: Client Access Group Security is enabled on this form.
To generate an import spreadsheet:
| 1. | Click + to expand this panel, which is closed by default. |
| 2. | Select a template from the Use Template drop-down (optional). These are templates that will be created by your organization. There are two tables that assist in creating a downloadable spreadsheet: Fields to Update and Employees to Update. |
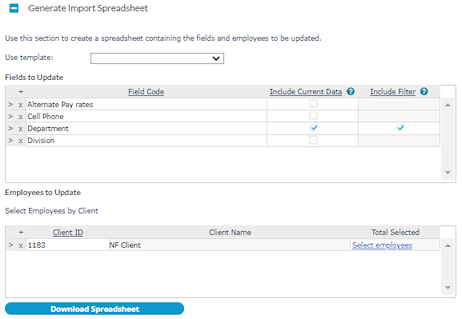
| 3. | Add field or employee information that you want included in the spreadsheet. |
| Option |
Description |
||||||||||||||||||
|---|---|---|---|---|---|---|---|---|---|---|---|---|---|---|---|---|---|---|---|
|
Fields to Update |
Add field codes as follows:
Note: Selections made on the Field Selector become filters on the Employee Selector, if the Include Filter box is checked. (See Multi-Selectors and Dynamic Filtering for more information.) |
||||||||||||||||||
|
Employees to Update |
Add employees that need to be updated as follows:
Note: Filters on the top of the Employee Selector are the result of field selections made on the Field Selector. After selecting an ID, the Employee Name and Company populate their respective fields. Both fields are read-only |
||||||||||||||||||
|
Include Current Data |
Select the Include Current Data checkbox if you want the existing values for the field to be included in the downloaded spreadsheet. The default setting is unchecked. (Note: If you leave this field unchecked, a blank value displays in the downloaded spreadsheet.) |
||||||||||||||||||
|
Include Filter |
Select the Include Filter checkbox to create a filter for this field on the employee selector. The default setting is unchecked. Note the following:
|
| 4. | Download this information in CSV format by clicking Download Spreadsheet. You can use this spreadsheet to update information and then import back into the system. You can save this data as a template. (See Saving the Spreadsheet as a Template for more information.) |
Fields Import Format Changes
The PrismHR field import format has changed. Field names are now the same as a field description. For example, <JOB> is now Position. Field values also include a field description that precedes the field value. As seen here, Promo is preceded by New Position Reason Code. This corresponds to a field on Employee Details. This example compares the old way of specifying fields against the updated way.

For grouped fields , this new format also can handle changes with multiple records per field.
