This page has moved and will no longer be updated. To access the current page, click the Online Help  icon in PrismHR or navigate to the new help docs site and search for your topic.
Tracking Payments to Employees
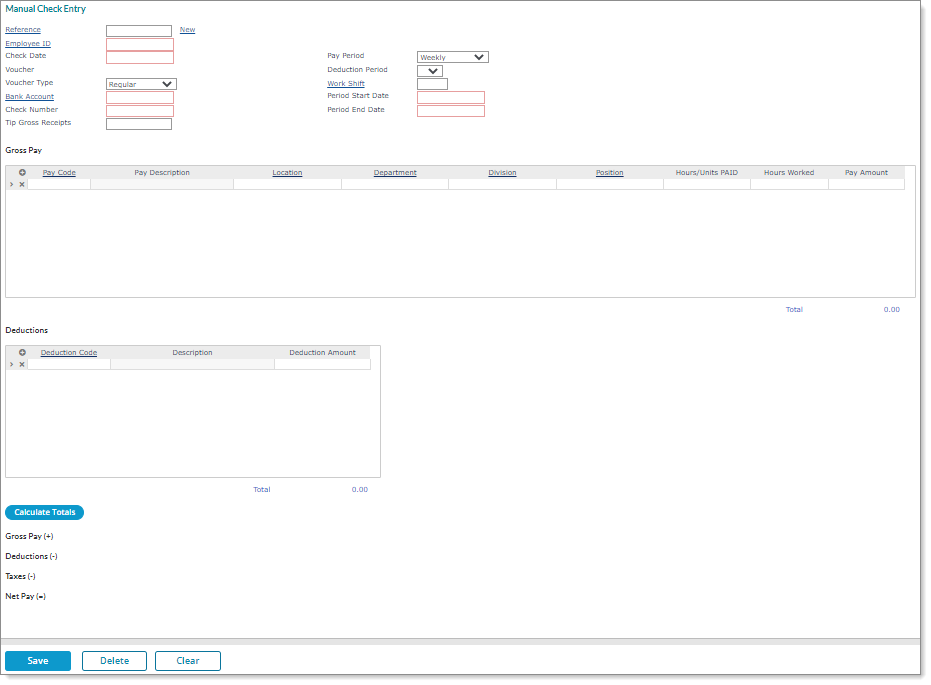
Use the Manual Check Entry form to track a payment made manually by the client to an employee.
The manual check process generates a voucher that the system includes in the client’s next payroll batch, then updates the payroll registers when the payroll processor posts the batch.
After completing a manual check entry, you can create a zero-dollar, non-negotiable pay stub by accessing the voucher from either the Process Payroll form or the Employee Voucher form. (This feature is only available for new payrolls, not previously processed payrolls.)
Note: Only service providers are allowed to select a bank account number in the Bank Account field, so this field does not display for Worksite Managers and Worksite Trusted Advisors. Instead, the bank account number defaults to 999 in the background when WSMs and WTAs are processing this form.
To track payments to employees, do the following:
|
1.
|
Click New to create a new manual check entry, or enter or select the Reference number to view an existing entry. This is a unique internal identifier, and not the same as the check number. |
Note the following:
|
•
|
If you edit an existing manual check entry, you can click the Show Details button to see the voucher information, which consists of the pay summary, deductions summary, and tax summary, along with the gross pay, deductions, taxes, and net pay. |
|
•
|
If you enter or select an existing manual check entry that was created by processing a backdated leave request, the Backdated Leave Request attribute displays in the upper-right corner. (This is helpful in determining whether a manual check entry is for a backdated leave request.) |
|
2.
|
Enter the Employee by either entering the name, Social Security Number, or ID to display a pop-up list of matching employee records. You can also click the field label or press Ctrl+Enter with your cursor in this field to open the search window. |
|
3.
|
Enter the Check Date. The default is the current date. |
When your organization processes the payroll that includes this check, the pay date on the manual check voucher will be set to the date as the payroll batch for tax liability purposes. The period start and end dates remain the same.
|
4.
|
The system populates the Voucher number. |
|
5.
|
Select the Voucher Type that was issued to the employee: Regular, VOID, or Supplemental. |
|
6.
|
Enter the Bank Account from which the check was drawn. If you select an account that will not credit the client back for the amount of the net check, the system warns you and gives you the opportunity to change or confirm the account. |
|
7.
|
Enter the Check Number that the client issued to the employee. |
Note: When working with existing manual check entries, you can update the check number if it is still in Pending status. (This option is not available if the entry is in Initialized or Posted status.)
|
8.
|
Enter the amount of Tip Gross Receipts to record if you require allocated tip calculations. |
|
9.
|
Select a Pay Period to use in calculating taxes for the pay amount: Weekly, Biweekly, Semi-monthly, Monthly, Quarterly, or Annually. The system uses the default value of the employee's pay group. |
|
10.
|
Select the Deduction Period for which the system should calculate standard deductions and benefits. If you do not select a deduction period, the system does not include any standard deductions. |
|
11.
|
Enter the Work Shift applicable to the payroll voucher, if any. |
|
12.
|
Enter the Period Start Date. |
|
13.
|
Enter the Period End Date. |
|
14.
|
Enter the pay in the Gross Pay panel: |
|
•
|
Enter the Pay Code. The Pay Description displays. |
|
•
|
To allocate wages, enter or select the Location, Department, Division, or Position. |
Note: The system only displays the fields as defined in the user's access record.
If you select a field, a list of available selections displays. You can refine this list to search for a particular item.
Note: If there is an existing home assignment for the employee recorded on the Employee Details form’s Work tab, the system automatically pulls it into these fields. You can change these settings by making new selections in these fields.
|
•
|
Enter the Hours/Units Paid. |
|
•
|
The Hours Worked defaults to either the same as the hours paid or zero, depending on whether the pay code is used to pay productive work. You can edit the Hours Worked as needed. |
|
•
|
The system calculates the default Pay Amount based on the calculation rules for the pay code. You can override it as necessary. |
|
15.
|
In the Deductions panel, enter any voluntary deductions that should be removed from the check in addition to those for the Deduction Period. |
Note: You can add voluntary deductions to the manual check entry if those voluntary deductions are listed on the employee's recurring deductions or when the deduction period is blank. (This allows you to enter voluntary deductions directly in the Manual Check Entry form. However, the system does not pull recurring deductions into the manual check.)
|
•
|
Enter the Deduction Code. The Description displays. |
|
•
|
Enter the Deduction Amount. |
|
16.
|
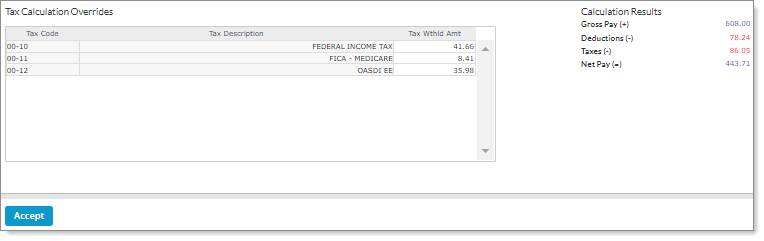
Click Calculate Totals. The system calculates the taxes for this check, then displays the amounts in the Calculation Results form. For example: |
|
17.
|
Review the results. If the taxes are not correct, edit the amounts in the Tax Wthld Amt column. |
Note: You can enable the DISABLE-MANUALCHK-TAX-EDIT-WSM custom feature code to prevent worksite managers and worksite trusted advisors from editing taxes in the Tax Wthld Amt column on the Tax Calculation Overrides form, which is accessible after calculating the totals in a manual check entry. (Service providers can continue to edit taxes in the Tax Wthld Amt column even if this custom feature code is applied.) See Specifying Client Custom Feature Codes.
|
18.
|
Click Accept to return to the Manual Check Entry form. |
WARNING: Once you save the check, you cannot recalculate it. Be sure it is correct before saving. If the check was not correct, delete it and enter a new check.
|
19.
|
When you are satisfied that the manual check entry is correct, click Save. |
The system posts the information on this voucher to the registers when your organization posts the next payroll batch for the client.
