This page has moved and will no longer be updated. To access the current page, click the Online Help  icon in PrismHR or navigate to the new help docs site and search for your topic.
Setting Up and Tracking Employee Loans
Use the Employee Loans form to establish employee loan information, track the payment of the loan, and view loan payments that were deducted from employee paychecks.
Outside of this form, you can track arrears against the employee loan using one of two methods, which are described in Tracking Arrears.
When you set up a new loan for an employee, PrismHR automatically generates a unique loan identification number. You then enter the amount, date, and reason (optional) for the loan, as well as the employee’s payment deduction amount and frequency.
The Employee Loans panel in the Employee Loans form establishes the information required for the employee loan. Click the Data Import Tool icon ( ) to upload a database file and import data. For more information, see Using the Data Import Tool.
Note the following:
|
•
|
Users whose user role is set to DENY for the Employee Loans form cannot import data using the Employee Loans import template and subsequently, the Data Import Tool icon will not display on the Employee Loans form. |
|
•
|
Users whose user role is set to INQUIRY for the Employee Loans form, but whose user role is also set to DENY for the Data Import Tool cannot view the Import icon on the Employee Loans form. |
|
•
|
Users whose user role is set to INQUIRY for the Employee Loans form can view the Employee Loans import template, but cannot import data. |
Setting Up an Employee Loan
To set up an employee loan, do the following:
|
1.
|
Enter an existing Loan Number or click Set up a new loan. PrismHR assigns the loan numbers. |
|
2.
|
Enter the Employee by either entering the name, Social Security Number, or ID to display a pop-up list of matching employee records. You can also click the field label or press Ctrl+Enter with your cursor in this field to open the search window. This is the employee who is responsible for the loan. |
|
3.
|
Enter the Loan Date on which this loan was granted. |
|
4.
|
Enter the Loan Amount granted to the employee. This value must be greater than zero. |
|
5.
|
Enter the Reason for Loan. |
|
6.
|
Enter the Loan Payment amount to deduct automatically from each paycheck in order to repay the loan. |
|
7.
|
Select the Payment Frequency for the payroll deduction; the default is once per pay period. |
|
8.
|
Enter the Payback Amount required to consider the loan paid in full, which is the amount of this loan plus interest (if any). |
|
9.
|
Enter the Deduction Start Date on which payroll deductions will begin to pay back the loan. |
|
10.
|
Enter the Deduction Stop Date on which payroll deductions will cease. |
Note: If you do not enter a Stop Date, PrismHR continues to deduct loan payments until the Payback Amount has been satisfied.
|
11.
|
Select the Deduction Code used for the employee loan. |
|
12.
|
Enter the G/L Override Account code to which this deduction is credited. This is used only in the Corporate Edition. |
|
13.
|
Enter or select the Payee for the employee loan. |
Note: Only payees who have the Loans payee type on the Payees form display in the Select Payee list. Also, you can only enter or select a Payee whose Third Party Format for the Processor ID associated with the Payroll Check Account is set to Cachet or --Select-- on the ACH Originators form.
|
14.
|
The Amount Paid field displays the amount that the employee has paid back on this loan to date. If you are creating a record for a loan where the employee has already made some payments, enter the total paid to date in this field. |
Tracking Loan Payments
The Payments panel displays the payment history of the employee loan. It lists the date of payment, the associated voucher, the ACH reference, such as a garnishment, and the payment amount.
Note: The ACH file includes the employee loan deduction amount, the routing and account number, and the client ID and employee ID.
Tracking Arrears
Use one of the following methods to track arrears on an employee loan:
|
•
|
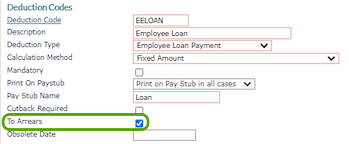
Deduction Codes form: Enter or select an Employee Loan Deduction code in the Deduction Code field, then select the To Arrears field. For example: |
|
•
|
Control tab on the Client Details form: Enter or select an Employee Loan Deduction code in the Voluntary/Employee Loan Deductions To Arrears field. (Previously, this field was titled Voluntary Deductions To Arrears.) For example: |

Note the following when using the arrears feature:
|
•
|
After an employee loan transfers to arrears, it displays on the Employee Deduction Arrears form, which is accessible from the Payroll|Change menu, and on the Deduction Arrears form, which is accessible from the Actions menu  on the Employee Details form. on the Employee Details form. |
|
•
|
An employee loan in arrears displays in the Payroll Deduction in Arrears Report, which is accessible from the Payroll|Report menu. (See the Payroll Reports Guide.) |
After you setup the tracking method, here's what happens with the arrears based on the Payment Frequency selected in the Employee Loans form:
|
•
|
Once Each Payroll Period (default): Transfers to arrears and deducted from arrears on each payroll for the employee. |
|
•
|
Once a Month: Transfers to arrears and deducted from arrears on the next payroll for the employee. After that occurrence, the deduction always occurs on the first payroll of the month. |
Recording Partial Arrears Amounts
The system records a partial arrears amount in the To Arrears panel (portion that is placed into arrears) or the From Arrears panel (portion of the arrears amount from previous pay period that displays as being deducted) in the Deductions tab on the Payroll Voucher form, if the employee is only paid enough to deduct some of the loan deduction amount.
The Loan # column in the To Arrears panel or the From Arrears panel displays the loan number from the Employee Loan form that allows loan arrears to display separately based on the loan number, if an employee has more than one employee loan.
Note: If an employee has multiple loans that transfer to arrears or from arrears with the same deduction code on the same date, the system displays multiple rows (one for each loan) in the Loan # column.
