This page has moved and will no longer be updated. To access the current page, click the Online Help  icon in PrismHR or navigate to the new help docs site and search for your topic.
Setting Up ASO Client Accounting
Note: These instructions assume you have already setup an ASO client.
You can setup ASO Client Accounting using these Client menu options:
|
•
|
ASO Global G/L Account Setup |
Creating ASO Accounting Codes
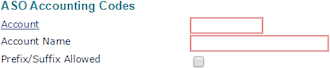
Use the ASO Accounting Codes form to create the core chart of account numbers for your client.
To create the core chart of account numbers, do the following:
|
1.
|
Select ASO Accounting Codes from the Client|Change menu. The ASO Accounting Codes form opens. |
|
2.
|
Enter the Account code. |
|
3.
|
Enter the Account Name. |
|
4.
|
Select Prefix/Suffix Allowed if the client uses a prefix or a suffix in addition to the core account number. |
|
6.
|
Repeat this procedure for each account you need to setup. |
Setting Up ASO Global G/L Account
Use the ASO Global General Ledger Account Setup form to setup global parameters and build the structure that determines how to assign the account numbers to codes within PrismHR.
To setup global parameters and build the structure, do the following:
|
1.
|
Select ASO Global G/L Account Setup from the Client|Change menu. The ASO Global G/L Account Setup form opens. |

|
2.
|
Select Allocate Company Contributions if the allocation of company contributions is for cost accounting purposes. The system allocates the company contributions in the same proportion as time sheet earnings. |
|
3.
|
Select Allocate Employee Deductions to base the allocation of the employee deductions on the same proportion as time sheet earnings. The system allocates the employee deductions in the same proportion as time sheet earnings. |
|
4.
|
Enter an Account Prefix the client can use. |
|
5.
|
Enter an Account Suffix the client can use. |
|
6.
|
Select a Segment Delimiter to separate your client’s G/L account segments. |
|
7.
|
Enter a Core Account Segment No that indicates the segment of the account number contained in the G/L account setup. |
|
8.
|
Select an Accounting System Type that determines the type of download PrismHR will create for the client. |
Note: Accounting packages that use comma-delimited text files can use the Peachtree format. Therefore, it is also the generic choice for the accounting system type.
|
9.
|
Use the Prefix/Suffix Overrides panel to create rules for the global prefix/suffix options. |

Note: This example shows that if the DEPARTMENT code in the system was ADMIN, the client wants the number 100 instead.
|
10.
|
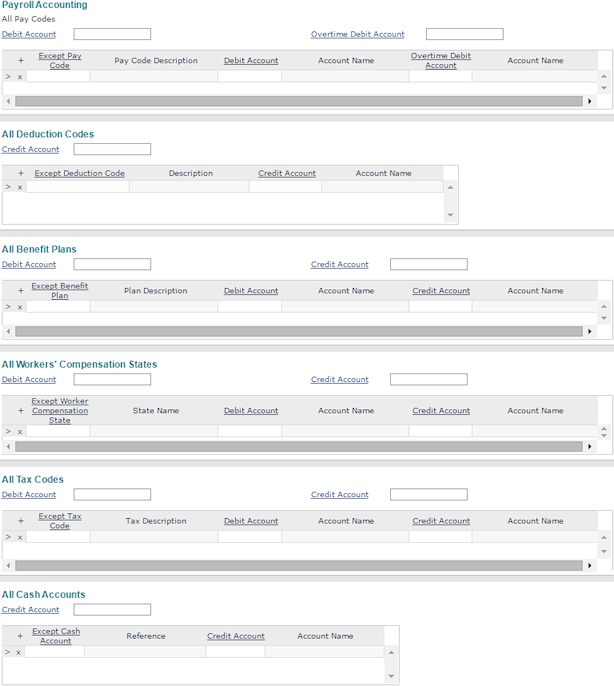
Use these panels to setup the ASO Client Accounting, so the G/L codes are assigned to various codes within PrismHR. |
|
•
|
You can assign a specific G/L to each pay code, deduction code, benefit plan (including retirement plans), workers’ compensation plan, tax code, and cash account. |
|
•
|
You can indicate all codes by using an * in the code field and then assigning it a G/L number. You can also assign a G/L account number to the Administration Fee charged to the client. |
|
•
|
You can setup ASO Client Accounting for a client with a simple chart of accounts, or one that is more complex. The system cannot accommodate all structures, but there are several ways to set these up using the prefix/suffix options to achieve what the client needs. |
|
11.
|
Use the Bill Code ASO Accounts panel to enter any bill code and account information. |

Setting Up ASO G/L Account
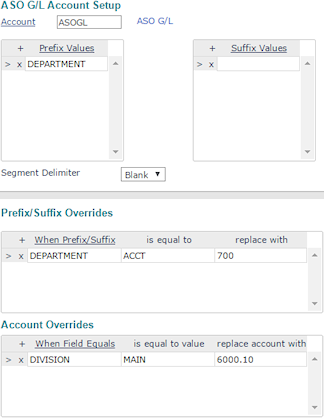
Use the ASO General Ledger Account Setup form to build the structure for chart of account number segments if they are different than what is setup in the global parameters. Here you can indicate what overrides, if any, are necessary to meet the client's account structure requirements.
To build the structure for chart of account number segments, do the following:
|
1.
|
Select ASO G/L Account Setup from the Client|Change menu. The ASO G/L Account Setup form opens. |
|
2.
|
Enter the core Account code. |
|
3.
|
Select a Segment Delimiter to separate your client’s G/L account segments. |
|
4.
|
Enter an account Prefix Value, if required. |
|
5.
|
Enter an account Suffix Value, if required. |
|
6.
|
Enter an Account Prefix/Suffix Override the client can use. |
|
7.
|
Enter an Account Override the client may use. |
|
•
|
The example shows the department code ACCT (as setup in the Department Codes for the client) is replaced with a numeric value of 700. This means that the account number would show as 700-6000 in the report or download for the client. |
|
•
|
The example also shows that LOCATION was chosen as the field to create an override. When it is equal to MAIN, PrismHR overrides it with an account number 6000.10. So instead of the account number displaying as 6000, it is 6000.10. |
If you had both the Prefix/Suffix and the Account overrides filled out in this example, the account number for reports and downloads would be 700-6000.10.
