Setting Up PEO Client Accounting
PrismHR lets you create an accounting download file and report for your client that breaks out invoice numbers and uses the client’s own account numbers.
You must perform four major tasks to create a report and download file:
- Define the global or client accounting templates.
- Create the accounting download directory. (Note: These instructions are for On-Premise customers only.)
- Enable the client accounting for a client company.
- Create the download file.
Understanding Accounting Templates
Using General Ledger Account Numbers
The client accounting templates associate your company’s payroll and billing codes with the client’s general ledger account numbers. These associations enable PrismHR to build an accounting download file and a report with data created during payroll processing.
A client company may account for different types of earnings, deductions that have the Rebate bill code, and employer-paid taxes—or other items that are not included in payroll checks, such as delivery fees or report fees. PrismHR allows you to create an accounting entry per bill code. PrismHR also allows you to use “wildcards” that will be swapped out for the appropriate number at the time of payroll initialization; for example, your client charges REG (Regular) pay to account 5101.EEDP and OT (Overtime) pay to account 5105.EEDP. (The wildcard EEDP stands for Employee’s Department.) Wildcards and their usage are explained in “Defining Accounting Templates.”
The format of the client account codes usually depends on the company’s accounting system. PrismHR can create an accounting download file in one of the following formats:
| • | A generic comma-delimited file |
| • | A file that can be easily imported directly into PeachTree, QuickBooks, or Great Plains |
Note: If you want to create a QuickBooks Billing template, contact PrismHR HR Support to submit a Professional Service engagement/request.
| • | A custom layout |
There are a few ways to enter client account numbers so that client accounting is generated:
| • | Global Accounting Template alone. |
| • | Global Accounting Template with client-level overrides. |
| • | Global Accounting Template with invoice-format overrides (Note: If you want to use an account at the billing format, that number is referenced from the Bill Codes in the Company Account field on the Billing Formats form.) |
| • | Client Accounting Template alone. |
Using Client Bill Format Account Number Overrides
One feature in PrismHR that is available—but not likely to be used—is replacing account numbers on the global or client account template with account numbers on the invoice format. If the invoice format contains summarized items, you can replace the account number on the invoice format with the client accounting template account numbers.
You can use this feature to make sure the client’s accounting detail is no more than the detail provided on the invoice. This same control is achieved on the client accounting setup by making sure items grouped together for invoicing all go to the same client account number.
For example, the client company uses a bundled accounting format. You do not want your 005 (Comp), 004 (Taxes), and 006 (Admin Fee) billing codes to charge different client accounting codes. If you did, the client would essentially receive a breakdown of their bundled rate.
Because it is common for many different clients to share a bill format, this option is usually not the best choice. It offers little more than what you could accomplish by carefully designing the client-level and/or global templates. It also makes the template impossible to share.
Defining Accounting Templates and Using Wildcards
Defining the Global Client Accounting Template
PEOs can set up client accounting in the following ways:
| • | By Client Template (PEO Client Account form): Usually, PEOs produce client accounting reports and download files using account numbers and formats specific to each client company. |
| • | By Global Account Template: In a few cases, a PEO might create global account numbers; for example, the PEO might have a group of clients that are defined separately but feed a common accounting system (for example, a franchise operation). The global template allows different clients to share the same accounting setup, where only varying accounts would be set up on the individual clients. |
WARNING: The client accounting templates that prepare downloads must work correctly. Make sure you understand the format requirements before making changes.
To define the global PEO client accounting template:
| 1. | Access the Global PEO Client Accounting Templates form in the System|Change menu. |
| 2. | Complete the following: |
|
Field Name |
Description |
||||||||||||||||||
|---|---|---|---|---|---|---|---|---|---|---|---|---|---|---|---|---|---|---|---|
| Accounting Template ID |
|
||||||||||||||||||
| Template Description |
Enter the description of the global client accounting template entered above. Note: For an existing global client accounting template ID, this field will auto-populate. You can edit the template description here. |
||||||||||||||||||
| Client Accounting System |
Select the client accounting system to be used for this global client accounting template from the following options:
Note: For an existing global client accounting template, this field will auto-populate. You can edit the client accounting system here. |
||||||||||||||||||
| Match Format |
If present, this will test the entries to ensure they follow the format. Enter a format to ensure that the G/L Account numbers entered into each code section matches the format in this field. The options you can use in this field are N, A, or X, where N is a number, A is an alphabetic character, and X is a wildcard, which means you can use anything. A zero in front of the X (that is, 0X) indicates that section of the code can be any length and any character. (An error displays, "This entry does not match the mask pattern!", if the Acct Format entered does not adhere to the Match Format.) For example, if you enter 4N-2N, which indicates four numbers, with two numbers in this field, so any G/L number you enter must be in that format. For example, 4321-23 is a valid Acct Format, but 64321-23 is not because its format is five numbers, with two numbers in this field. |
||||||||||||||||||
| Earning Codes |
Enter the earning code here to build the client accounting template or click the Earning Code link to select the one you want from the Pay Code Search dialog box. You can select more than one earning code for a client accounting template by clicking on the (+) sign before the Earn Code link. The Description of the earning code will auto-populate which cannot be edited. In the Earn Acct Format, enter the account number format. Note:
|
||||||||||||||||||
|
Deduction Codes |
Enter the deduction code here to build the client accounting template or click the Deduct Code link to select the one you want from the Deduction Codes dialog box. You can select more than one deduction code for a client accounting template by clicking on the (+) sign before the Deduct Code link. The Description of the deduction code will auto-populate which cannot be edited. In the Deduction Account Format, enter the account number format. This field does not allocate. Note:
|
||||||||||||||||||
|
Tax Codes |
Enter the Vertex tax code here to build the global client accounting template or click the Tax Code link to select the one you want from the Select Tax Code dialog box. You can select more than one tax code for a global client accounting template by clicking on the (+) sign before the Tax Code link. The Description of the tax code will auto-populate which cannot be edited. In the Tax Account Format, enter the account number format. Note:
|
||||||||||||||||||
|
Other Bill Codes |
Enter other bill code here to build the global client accounting template or click the Other Bill Code link to select the one you want from the Select Billing Code dialog box. You can select more than one bill code for a global client accounting template by clicking on the (+) sign before the Other Bill Code link. The Description of the other bill code will auto-populate which cannot be edited. In the Other Bill Account Format, enter the account number format. Note:
|
| 3. | Click Save to either save the new global client accounting template or save the changes made to an existing global client accounting template. Upon saving, the form is cleared. |
| 4. | Click Delete to delete an existing global client accounting template any time. |
| 5. | Click Clear to clear this form. |
You can use the following wildcards in the Account Format fields:
|
Description |
|
|---|---|
|
CLCC |
Client Cost Center |
|
CLSCC |
Client Sub Cost Center |
|
EEDP |
Employee Department |
|
EEDP2 |
Employee Department Two |
|
EEDV |
Employee Division |
|
EEDV2 |
Employee Division Two |
|
EEDV3 |
Employee Division Three |
|
EEJB |
Employee Position |
|
EEJB2 |
Employee Position Two |
|
EEJB3 |
Employee Position Three |
|
EEHL |
Employee Home Location - New |
|
EELCC |
Employee Location Code |
|
EELC |
Employee Location |
|
EELC2 |
Employee Location Two |
|
EELC3 |
Employee Location Three |
|
EEPR |
Employee Project |
|
EESCC |
Employee Sub Cost Center |
|
EMCC |
Employer Cost Center |
|
EMSCC |
Employer Sub Cost Center |
|
MSCL01 - MSCL99 |
Client Miscellaneous GL Codes 01-99 |
|
EEMDP01 - EEMDP99 |
Employee Department Miscellaneous GL Codes 01-99 |
|
EEMDV01 - EEMDV99 |
Employee Division Miscellaneous GL Codes 01-99 |
|
EEMJB01 - EEMJB99 |
Employee Position Miscellaneous GL Codes 01-99 |
|
EEMLPJ01 - EEMLPJ99 |
Employee Project Miscellaneous GL Codes 01-99 |
|
EEMLC01 - EEMLC99 |
Employee Worksite Location Miscellaneous GL Codes 01-99 |
Understanding the Fields That Wildcards Represent
The wildcards for the Account Format fields represent the values of certain fields. Examples of where the wildcards are located, including the menu options and fields, are illustrated below.
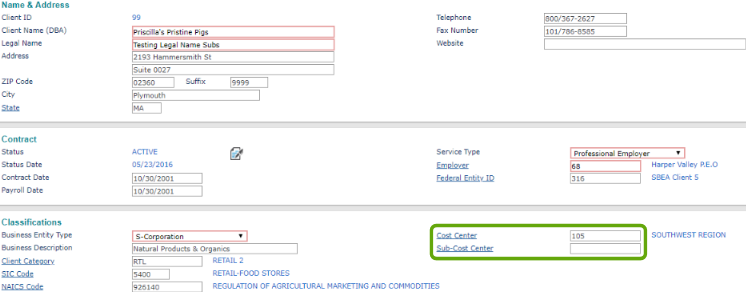
| • | Go to Client Details (found in the menu under Client|Change). |
CLCC = Client Cost Center
CLSCC = Client Sub Cost Center
| • | Go to Worksite Locations (found in the menu under Client|Change). |
EELCC = Employee Location Code
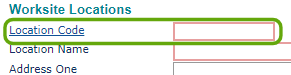
EELC = Employee Location GL Code 1
EELC2 = Employee Location GL Code 2
EELC3 = Employee Location GL Code 3
EEHL = Employee Home Location
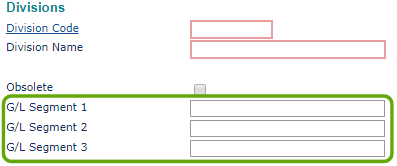
| • | Go to Divisions (found in the menu under Client|Change). |
EEDV = Employee Division
EEDV2 = Employee Division 2
EEDV3 = Employee Division 3
| • | Go to Departments (found in the menu under Client|Change). |
EEDP = Employee Department
EEDP2 = Employee Department GL Code 2

| • | Go to Projects (found in the menu under Client|Change). |
EEPR = Employee Project Code

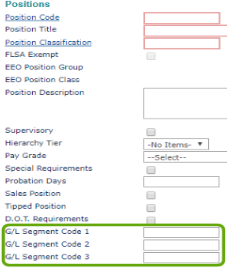
| • | Go to Positions (found in the menu under Client|Change). |
EEJB = Employee Job
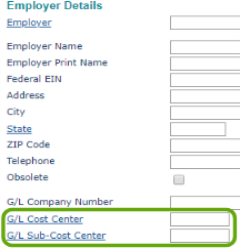
| • | Go to Employer Details (found in the Employer menu under Employer|Change). |
EMCC = Employer Cost Center
EMSCC = Employer Sub Cost Center
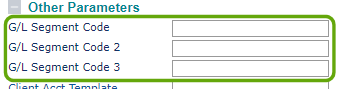
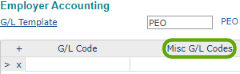
| • | Go to the Controls tab (found in the menu under Client|Change). Navigate to the Employer Accounting panel. |
MSCL01 - MSCL99 = Client Miscellaneous GL Codes 01-99
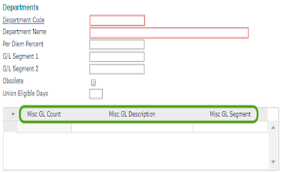
| • | Go to Departments (found in the menu under Client|Change). |
EEMDP01 - EEMDP99 = Employee Department Miscellaneous GL Codes 01-99
Defining a PEO Client Accounting Template
The PEO Client Accounting Maintenance file defines the client accounts the system builds into the client accounting download file and report.
To create a client-specific accounting template:
| 1. | With the appropriate client company selected, go to the PEO Client Accounting form (found in the menu under Client|Change). |

| 2. | Create an identifying name for this template in the Account Template field. |
| 3. | Select the Client Accounting System type. |
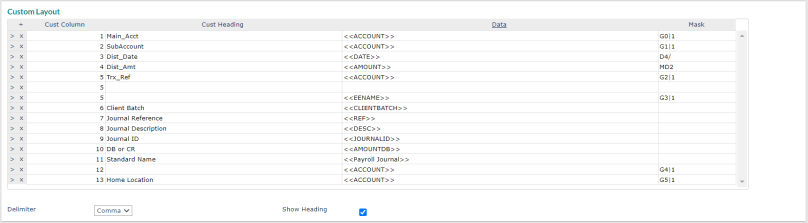
If you select the Custom option, the Custom Layout panel opens.
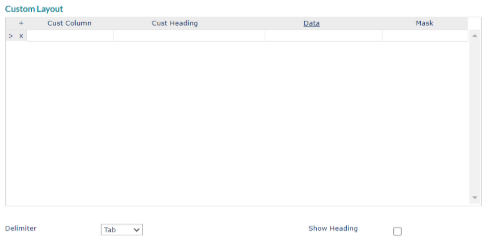
| • | In the Cust Column field, enter a row number, usually starting with 1. |
| • | In the Cust Heading field, enter a description for the column, such as Date. |
| • | In the Data field, click the Data hyperlink, which provides a list of options to select from. |
| • | If the option you select requires a mask, select a Mask option. |
|
Conversion |
Internal |
External |
Type |
Description |
|---|---|---|---|---|
|
MD2, |
Null |
|
Decimal |
Null internal value displays an external Blank space |
|
MD2 |
10000 |
100.00 |
Decimal |
Value adds decimal before late numbers |
|
D2- |
14281 |
02-05-07 |
Date |
mm-dd-yy |
|
D4- |
14281 |
02-05-2007 |
Date |
mm-dd-yyyy |
|
D2/ |
14281 |
02/05/07 |
Date |
mm/dd/yy |
|
D4/ |
14281 |
02/05/2007 |
Date |
mm/dd/yyyy |
|
D0 |
14281 |
05 FEB |
Date |
dd mmm |
|
D |
14281 |
05 FEB 2007 |
Date |
dd mmm yyyy |
|
D- |
14281 |
02-05-2007 |
Date |
mm-dd-yyyy |
|
D2Y |
14281 |
07 |
Date |
yy (2-digit year) |
|
DY |
14281 |
2007 |
Date |
yyyy (4-digit-year) |
|
DD |
14281 |
05 |
Date |
dd (numeric day of month) |
|
DM |
14281 |
2 |
Date |
mm (numeric month of year |
|
DMA |
14281 |
FEBRUARY |
Date |
xxx (alphabetic month number), A = alphabetic form |
|
DMA3 |
14281 |
FEB |
Date |
xxx (alphabetic month name) |
|
DWA |
14281 |
MONDAY |
Date |
xxx (alphabetic day name) |
|
DWB |
14281 |
MON |
Date |
xxx (alphabetic day name), B = abbreviated form |
|
DMY |
14281 |
2 2007 |
Date |
mm (numeric month of year) yyyy (4-digit year) |
|
DDMY |
14281 |
05 02 2007 |
Date |
Day Month Year (Same on USA and European Systems) |
|
DDMY2- |
14281 |
05-02-07 |
Date |
Day-Month-Year (Same on USA and European Systems) |
|
DDMY4- |
14281 |
05-02-2007 |
Date |
Day-Month-Year (Same on USA and European Systems) |
|
DDMAY |
14281 |
05 FEBRUARY 2007 |
Date |
Day Month Year (Same on USA and European Systems) |
|
DYMD[4,2,2] |
14281 |
2007 02 05 |
Date |
Year (4 digit) Month (2 digit) Day (2 digit (Same on USA/Euro Systems) |
|
G0|1 |
pick|is|a|quick|dbms |
pick |
Group |
Group Extraction using the delimiter of "|" |
|
G1|1 |
pick|is|a|quick|dbms |
is |
Group |
Group Extraction using the delimiter of "|" |
|
G1|2 |
pick|is|a|quick|dbms |
is|a |
Group |
Group Extraction using the delimiter of "|" |
|
G1|3 |
pick|is|a|quick|dbms |
is|a|quick |
Group |
Group Extraction using the delimiter of "|" |
|
G2|1 |
pick|is|a|quick|dbms |
a |
Group |
Group Extraction using the delimiter of "|" |
|
G4|1 |
pick|is|a|quick|dbms |
dbms |
Group |
Group Extraction using the delimiter of "|" |
| • | In the Delimiter field, select the type of file you need (tab- or comma-delimited). |
| • | If you want the heading to be on the first line of the file, select the Show Heading option. |
| 4. | If you have been instructed to do so by the PrismHR Customer Support Team, enter the QuickBooks Billing Template used for billing export. |
The QuickBooks Billing Template field is for Quick Book Extracts custom logic implementation. The system uses this instead of the Accounting Template. Use this field
| 5. | Enter the Global Account Template used for this client. |
| 6. | Enter the Name of Output File to specify the name of the file that the system creates for the client accounting download, if any. |
If you define an output file, PrismHR automatically creates the file during payroll processing and users can download it from the Payroll Reports or Payroll Summary. (Note: If using a Global Account Template, any account number assigned to a code in the PEO Client Accounting Template overrides the account number for that same code on the global account.)
| 7. | Enter the Company Offset Account number used to handle the accounting offset for this client. |
| 8. | For each pay code that uses a different format: |
| • | Enter a pay code in the Earn Code field to build an accounting format. You can also enter an asterisk (*), which indicates "all remaining" pay codes. The asterisk must be the last item on the list, if used; the system ignores all items listed after the asterisk row. |
| • | Enter the Earn Account Format. This overrides any format defined in the template and the common format. |
| 9. | For each tax account that uses a different format: |
| • | Enter the Vertex Tax Code to create client accounting. You can also enter an asterisk (*), which indicates "all remaining" tax codes. The asterisk must be the last item on the list, if used; the system ignores all items listed after the asterisk row. |
| • | Enter the full code or the tax identifier, which is the part after the dash. The state/county/local segments of the number precedes the dash. The first two numbers after the dash indicate the kind of tax. Refer to your documentation or voucher data to determine what codes to use. |
| • | Enter the Tax Account Format. This overrides any format defined in the template and the common format. |
| 10. | For each deduction code with the Rebate bill code that uses a different format, do the following: |
| • | Enter a Deduction Code to build an accounting format. You can also enter an asterisk (*), which indicates "all remaining" deduction codes. The asterisk must be the last item on the list, if used; the system ignores all items listed after the asterisk row. |
| • | Enter the Deduction Account Format. This overrides any format defined in the template and the common format. |
| 11. | For each bill code that uses a different format, do the following: |
| • | Enter an Other Bill Code that is not covered by the other fields, for example, employee setup, report, administrative, compensation, or delivery fees. You can also enter an asterisk (*), which indicates "all remaining" bill codes. The asterisk must be the last item on the list, if used; the system ignores all items listed after the asterisk row. |
| • | To set up an offset for a billing code that is set to Memo Client Acct Only, enter MEMO-OFFSET in the Other Bill Codes field. |
| • | Enter the Other Bill Account Format. This overrides any format defined in the template and the common format. |
| 12. | Select Use Non-Bill Accounting to open the Non-Bill Accounting panel. |
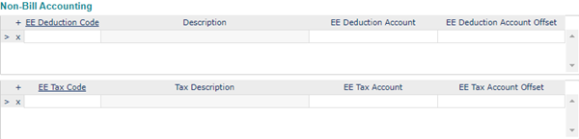
| 13. | Enter Employee (EE) Deduction Code information as follows: |
| • | Enter an EE Deduct Code. Select EE Deduction Code for a list. |
| • | Enter the EE Deduct Acct number. |
| • | Enter the EE Deduct Acct Offset. |
| 14. | Enter Employee Tax Code information as follows: |
| • | Enter an EE TaxCode. Select EE Tax Code for a list. |
| • | Enter the EE Tax Acct number. |
| • | Enter the EE Tax Acct Offset. |
| 15. | Enter the Employee Arrears account number for the receivables portion in the EE Arrears Received field. |
| 16. | Enter the ContraExpense account number for the receivables portion of the employee arrears in the EE Arrears ContraExp field. |
| 17. | Click Save. |
If you are building onto a global template, enter only differences or additions on the Company Accounting Maintenance screen. The system will use the data from the global template for any field on this screen that you leave empty.
Note: After initializing payroll, access Payroll > Process > Batch Processing > Display Initialized Invoice, then click F9 - Client Acctng to review the journal entry. At this point, you can change the accounts and re-initialize the payroll; however, once you have posted the payroll, you cannot change the accounts. Any changes you make will affect unposted payrolls only. In summary: You can change accounts for initialized payrolls. You cannot change accounts for posted payrolls.
Using the Global PEO Client Account Template
After you set up a Global PEO Client Account Template, you can assign that template to the Client in the PEO Client Accounting Setup form.
To assign the template:
| 1. | Go to |Change|PEO Client Accounting and select or enter a template name in the Account Template field. |
| 2. | Select the appropriate Client Accounting Template. |
| 3. | Click Global Account Template and select the template you want to assign to this Client’s accounting template. |
| 4. | After selecting the Global Account Template, click Save. The system generates the PEO Client Accounting based on the setup in the Global PEO Client Accounting Template; however, if you need to override any of the account numbers set up for a specific code in the Global Account Template, you can enter that code in the appropriate section of the PEO Client Accounting form and the system will use the G/L number you assign. |
Determining the Download Directory
After you have processed payroll, you can create an accounting download file to give the client later. You must assign a valid global directory path to which PrismHR writes all client download files. The path is known as the Client Journal Export path.
Note: Important! This section is for On-Premise customers only, whose systems might already be configured.
The file name used must be defined in PrismHR prior to use. Please contact a Support representative if this field is not populated on your system. The underlying file will have to be created. If you are not comfortable creating a DIRectory-level (DIR) file, please contact Support for assistance. This directory file should exist before you start writing Client Journal data. Otherwise, undesired outcomes—including data loss of those Client Journals—might occur.
To determine the accounting download directory (Client Journal Export) path, perform the following steps in the account in which you want the actual directory to exist. If you do this from the PrismHR (SCORPEO) directory, the new directory will exist in the PrismHR (SCORPEO) directory on the server.
To assign the template:
| 1. | Click Back Office. From System|Change select System Parameters. Navigate to the Global Accounting panel at the bottom of the form. |

| 2. | Enter the directory name in the field labeled Export Path for Company/Acctng. |
Enabling Client Accounting for a Client
Once you have created the client template and are ready to proceed with client accounting, you must enable the client company. Do not enable the client for client accounting until you have completed the client and global templates (see "Defining Accounting Templates").
To enable client accounting for a client:
| 1. | Go to the Control tab on Client Controls (accessed from Client|Change|Client Details). |
| 2. | Navigate to the Client Accounting panel. |
Note: Do not enable a client for client accounting, if the template has not been completed.
| 3. | Enable the Generate Accounting option. The client company is now enabled for client accounting. |
| 4. | Enter the accounting template ID to use for this client in the Accounting Template field. You can select Accounting Template and choose whether the template is a client or global template. |
| 5. | Access |Details|Control and click Override By Position in the Employer Accounting panel to enable the Position Code. |
Enabling the Position Code adds another panel, Account Overrides, to the Positions form, which you can access from |Change|Positions. In the Account Overrides panel, enter a Pay Code and a G/L Account Number that overrides the G/L Account Number on the PEO Accounting form for that same Pay Code, for this specific Position.
| 6. | Click Save. |
