Terminating an Employee
Use the Employee Termination form to terminate an employee.
Note: To terminate multiple employees at once, see Processing Mass Employee Changes.
When you terminate an employee, PrismHR performs the following based on your system’s global settings:
| • | Terminates the employee's benefits |
| • | Removes the employee's web access login |
| • | Disables the employee's ACH |
| • | Refunds the client for the new hire fee, if the PEO has a policy when new hires are terminated within 30 days of being hired |
| • | Displays a warning flag if the employee has an outstanding loan balance |
To terminate an employee:
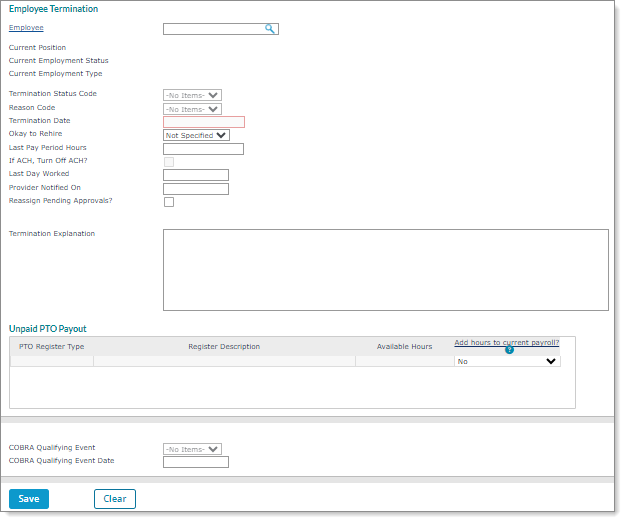
| 1. | Complete the following information: |
| Field | Description | |||||||||
|---|---|---|---|---|---|---|---|---|---|---|
|
Employee |
Enter the Employee by either entering the name, Social Security Number, or ID to display a pop-up list of matching employee records. You can also click the field label or press Ctrl+Enter with your cursor in this field to open the search window. The employee's name, Current Position, Current Employment Status, and Current Employment Type display. Note: If you terminate an employee who is both a PTO approver (as assigned on the Employee Details form) with assigned reports and a worksite manager, when you click Save a message displays that prompts you to review the PTO Approver Reassignment form, "<Employee ID> was assigned to approve PTO. Would you like to reassign them to a new PTO Approver now?" Selecting Yes displays the PTO Approver Reassignment form, where you can reassign those employees to a new PTO approver. (See Processing PTO Approver Reassignments.) |
|||||||||
|
Termination Status Code |
Select the Termination Status Code. Note: This field displays the full description of the status code, separated by a dash (-) in front of the status code. |
|||||||||
|
Reason Code |
Select the Reason Code for termination. |
|||||||||
|
Termination Date |
Enter the Termination Date. Note: Benefits for employees who have been terminated end on either the 15th of the month or at the end of the month, depending on the Termination Date. If the Termination Date is on or before the 15th of the month, benefits terminate on the 15th. If the Termination Date is after 15th of the month, benefits terminate at the end of the month. |
|||||||||
|
Okay to Rehire |
Use the Okay to Rehire drop-down to indicate whether the employee could potentially be rehired. If you select Yes or Not Specified, the employee will be available in the Rehire form's search.
|
|||||||||
|
Last Pay Period Hours |
Enter the number of hours for the last payout to the terminated employee. (Entering an amount here populates the timesheet for this terminated employee's last pay period, which is the pay period where their termination date is entered.) Note the following:
|
|||||||||
| If ACH, Turn Off ACH? | Select If ACH, Turn Off ACH if the employee should not receive further ACH transactions. The system sets the employee's ACH status to Inactive. | |||||||||
| Last Day Worked | Enter the Last Day Worked, which is the last date on which the employee worked. | |||||||||
|
Provider Notified On |
Enter the Provider Notified On, which is the day on which the service provider was notified that employment was terminated. |
|||||||||
|
Reassign Pending Approvals? |
Use the Reassign Pending Approvals? drop-down to indicate whether the pending approvals should be reassigned to another user:
Selecting Yes enables the Reassign to User ID field. Click the link to select a user from the Customer Users with Access search list, whose users are configured in the Client Security form on the Client|Change menu. Note: If you do not check Reassign Pending Approvals? and then click Save a message displays, "This employee has pending approvals assigned to them. Do you want to reassign them to a different client user?" Click Yes to reassign this employee's pending approvals. |
|||||||||
|
Termination Explanation |
Enter a detailed Termination Explanation, up to 200 characters, regarding the employee's termination. Note: You can enter a Termination Explanation that exceeds 200 characters when you enable the TERMEXPLAIN custom feature code on the System Parameters form. |
| 2. | If the employee has an available balance in their PTO Register, that information displays in the Unpaid PTO Payout panel. To apply the available hours to the employee's payout, click Yes in the Add hours to current payroll? field. The system adds the available hours to the current timesheet. |
Note: You can select the tool tip icon in the Add hours to current payroll? field to display information on how to use this field.
To hide this panel so Worksite Managers and Worksite Trusted Advisors cannot access it (recommended method), set the field security to Hidden for the form. (Setting the field security to Disable disables the panel on this form.)
| 3. | If applicable, enter COBRA information: |
| a. | Indicate whether the system should create a COBRA participant record. |
| b. | Select the COBRA Qualifying Event. |
| c. | Enter the COBRA Qualifying Event Date. |
| 4. | Click Save. |
Important!: After terminating an employee, you must also deactivate that employee by unchecking the Active User field on the Users form. (Terminated, yet active, employees will continue to display on the SuperBatch form.)
Status Type History
You can access the employee's status history by opening the Actions menu and selecting Status Type History. See Viewing Employment Status Updates for Employees for more information.
